
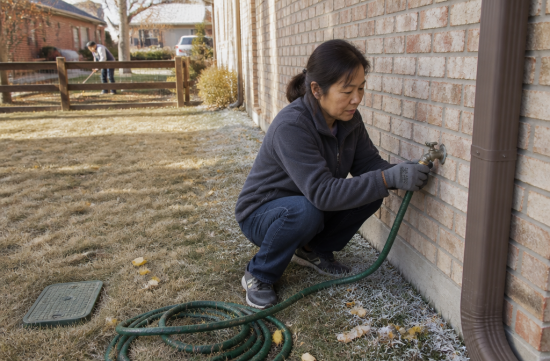
Last week, I stepped into the yard and paused when I saw the hose. The green hose that had been hanging from the wall faucet all summer was still attached. I thought, if I don't remove it today, it's going to be a big problem.
In fact, a few years ago, I left the hose attached over the winter and discovered in the spring that the basement wall was damp. I still remember what the plumber said when he came over: "You could have just removed the hose."
So today, I want to outline the winter preparations for the faucet and sprinkler that need to be done before the first frost arrives. It's nothing too complicated, and it can be done in just a couple of hours on a weekend afternoon.
First, let's look at the timing. According to the National Weather Service (NWS) Denver/Boulder office, the average first freeze date in Denver is October 7. Since today is October 10, that means we've already passed it based on the average.
The records are even scarier. The earliest first freeze was on September 8, which happened twice, in 1962 and 2020. Conversely, the latest was November 15, 1944.
So the conclusion is simple. Don't play a guessing game with the weather app; let's just get it done this weekend. Better safe than sorry is the perfect saying for this season.
This year, there's one more thing to consider. Due to severe drought, the Denver Water Board amended the drought resolution on August 26, prohibiting lawn watering and spray irrigation starting October 1.
The fines are quite steep. For single-family homes, the first violation is $500, the second is $1,000. After that, it can escalate to $1,000 and even a water supply shutoff, so this is not a trivial amount.
Trees, shrubs, and perennial plants can still be watered with a hand hose or drip irrigation. Annual flowers and vegetable gardens are also allowed to be watered in the same way until the first frost.
Since you can't run the sprinkler anymore, the excuse to delay winter preparations is gone. Denver Water also warns that irrigation pipes can burst when the first freeze hits.
Let's start with the faucet. The first step is definitely to remove the hose. If you coil it up and store it in the garage or shed, you'll save money on a new hose next spring if it cracks.
Many people have a misconception here. If you have a frost-free faucet, you might think it's okay to leave the hose attached, but that's not true.
A frost-free faucet has the actual valve located inside the warm part of the wall, so when you turn it off, the water in the outer pipe drains out. However, if the hose is attached, the water can't drain and will remain trapped, freezing in place.
In the end, you've installed an expensive faucet but are not getting any benefit from it. It's like buying a luxury jacket and not zipping it up.
The second step is to close the shut-off valve inside the house. Many homes have a separate valve leading to the outside faucet located in the basement or crawl space. You can close that valve and then open the outside faucet to drain any remaining water.
If you don't know where the valve is, start looking just inside the wall where the outside faucet is located. I also struggled to find it at first, but it was hiding behind the washing machine.
If you have an older home, it's also a good idea to put a cover on the faucet. You can find foam dome covers at hardware stores, and they're relatively inexpensive.
Now let's move on to the sprinkler. First, turn off the controller or switch it to rain mode. If the timer runs, you could end up receiving a fine notice along with a burst pipe.
Next, close the main shut-off valve. It's usually located in the valve box near the basement wall or in the yard.
The next step is the crucial blowout. This is the process of using compressed air to push the water out of the pipes, as any water left in the underground pipes can freeze and break the pipes, heads, or valves.
I honestly recommend having a professional handle this. If the air pressure is too high, it can damage the parts, and the backflow preventer can be tricky to deal with.
I once tried to do it myself with tools I had at home, and when one of the heads shot up like a fountain, I immediately picked up the phone. Since that day, our household rule is to leave the blowout to the pros.
However, keep in mind that companies can get busy in October, so you might have to wait for an appointment. If you haven't booked yet, it's best to start calling today.
For backflow preventers exposed above ground, wrapping them in insulation after the blowout will give you peace of mind. This is especially important in this area where the weather can be warm during the day and drop significantly at night.
To summarize, here's what you need to do: remove the hose, close the inside valve, and drain the outside faucet. Turn off the controller, close the main valve, and schedule the blowout.
Of these six tasks, the only one that costs money is the blowout. The rest can be done with a pair of gloves and a flashlight.
Some people say their home plumbing is sturdy enough, so it's fine, while others insist that everything must be done. Both have their points, but as someone who has received a bill for a burst pipe repair, I'm firmly in the "do everything" camp.
This weekend, take a walk around your yard with a cup of coffee. Taking just five minutes to remove a hose could save you a hefty repair bill come spring.
 CEOChoi





 hoosierdaddy |
 sun walker |
 Let's Be Like a Salt-like City Person |
 Springs Korea |
 US Legal Consultation on Trials |
  Your Curiosity Resolved |
 SWAT TEAM BLK |
 Jean Claude Bundang Blog |
 self-evaluation |
 Successful Manager Kim's Team |
  Hakuna Matata |
  Way to easy |
  Chino Min |
  nexabyte |
  moonshine 7 |
  Sunset Oregon |
  victoria 68 |
  golfmaster |
  Montgomery Mom |
  squidogame |
  Noodle Noodle |
  Rhode Island Good People |
  Big North |
  Famous Attractions in the United States |
  Jin Soo V |
  Starbucks Reserve Roastery Closure |
  peppermint |
  Stable Co. |
  Purple Moons, |