
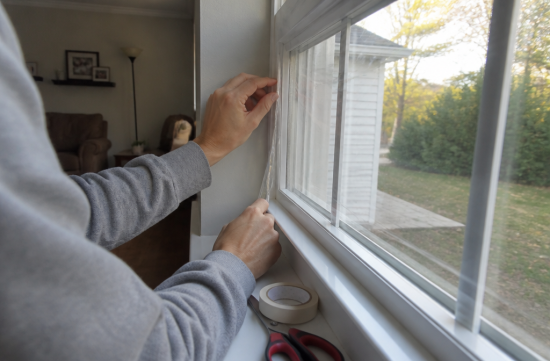
Last week, I turned on the heating for the first time, and I noticed a particularly chilly draft near the living room window. When I touched the glass, it felt cold, and I could feel a breeze sneaking in through the gaps in the window frame.
This issue is especially pronounced with old single-pane windows. Since there is only one layer of glass, it directly transmits the temperature difference between indoors and outdoors, making it one of the biggest culprits for heating costs leaking during winter.
Replacing the entire window with double glazing or low-E glass would be the most effective solution, but the cost can be quite high. So, this winter, I decided to try installing window insulation film myself for just a few tens of dollars.
Window insulation film is different from the bubble wrap commonly known as air cap rolls. It involves attaching a clear plastic film to the window frame with double-sided tape and then using a heat source like a hairdryer to shrink it tightly, creating a thin layer of air between the glass and the film.
This air layer is key. It means that instead of just one layer of glass, there is now an additional layer of air trapped between the glass and the film, which slows down the rate at which heat escapes.
I checked the prices first. The most widely sold indoor film kit from the Duck brand in the U.S. costs around $10 for a kit that covers five windows, while a larger package for 15 windows is priced around $23.
Additionally, I found weather stripping tape to seal the gaps in the window frame for under $10, and a tube of silicone caulk to fill fixed gaps costs about $5. For a few windows, just adding a tube of caulk to the film kit keeps the material cost around $20.
Of course, if you have many windows or if the condition of the frames is particularly poor, you might need to use an extra kit or tube of caulk. Still, compared to the cost of replacing windows, the difference in price is significant.
So, how effective is it really? According to the U.S. Department of Energy (DOE), installing such plastic film can reduce heat loss through single-pane glass by up to 55 percent.
However, this is only the maximum value achieved under perfect installation conditions and based on single-pane glass, which has the highest heat loss. In terms of actual heating energy consumption for an entire home, the reduction is typically between 10 to 20 percent for single-pane windows, and for homes already using double glazing, the reduction is about 5 to 10 percent.
This means that if your windows are relatively new and already double-glazed, you shouldn't expect significant benefits. Conversely, the more old single-pane windows you have, the more noticeable the effects of this film installation will be.
Some products on the market advertise that these film kits can reduce heating costs by 30 to 50 percent, but personally, I don't fully trust those numbers. Compared to actual data, it seems more like exaggerated marketing language.
However, if you combine weather stripping, caulking, and thick curtains, the situation changes. There have been reports of up to 30 percent savings in heating costs when multiple methods are applied together compared to using just the film alone.
There is also data suggesting that doing both film installation and sealing (air sealing) together is more effective than doing them separately. According to ENERGY STAR, sealing window gaps and insulating together can reduce annual heating and cooling costs by 10 to 15 percent.
The installation process is simpler than you might think. First, completely remove dust and moisture from the window frame, then wrap double-sided tape around all four edges of the frame.
Next, attach the film to the tape, pull the excess tightly, and evenly apply heat from a hairdryer to the film surface, causing it to gradually shrink tightly. If there are wrinkles, applying more heat will usually smooth them out.
The most common mistake people make is during the tape adhesion step. If there is even a tiny gap left at the corners of the window frame, cold air can continuously enter through that gap, significantly reducing the effectiveness. If you rush this step, you might end up spending money without feeling any difference.
The film reduces heat loss through the glass itself, while the weather stripping prevents drafts at the moving parts of the window, so they serve different purposes. Fixed joints where the frame and window meet should be sealed with caulk, while the moving parts should be finished with weather stripping.
If you apply caulk to the moving window frame, it could harden and prevent the window from opening, so it's crucial to maintain this distinction. It may seem like a small difference, but you might regret it later when you need to open the window.
There are definitely downsides. The film needs to be removed in the spring after one season of use, and you'll have to reapply it next winter, so it's not a permanent solution.
You should also consider that depending on the installation, the view outside may appear slightly hazy. If the window is one that you value for light or the view, this could be a subtle annoyance.
Still, for a job that can be completed in an afternoon for around $20, the conclusion is that it's a worthwhile investment. Especially for renters who cannot undertake permanent renovations like window replacements, finding such an alternative is not easy.
Before the temperatures drop further, I recommend addressing the windows where you feel the coldest air first. This isn't just about saving a few bucks; given the proven effectiveness, it's definitely worth trying.
 urbanvibemaker1973


 Silent Sea |
 Pointy |
 Idaho's Sumi's House |
 holy cheese |
 Michigan Enthusiast |
 Anova US Beauty Information |

 Carolina border |


 sweetvan |
  Augusta Univ |
  Round and Round Children's Song Kingdom |
  butter 90 |
  Lando Mao |
  Washington Denzel DJ |
  LIZ Legal Information Blog |
  vegas mom |
  Sandiego Auntie |
  Premium Gas Camp |
  Things to know |
  TEXAS Fishing Boat |
  AUTO OK |
  aaoaa |
  Florida King |
  Encyclopedia of New York and Surrounding Areas |
  Study Abroad Life Know-How Tips |
  Conflite Teacher |
  Montgomery Mom |